Quick Start
Create your first professional screen recording in minutes. Follow this guide to go from recording to export.
Start Recording
-
Open Screentell: Navigate to the main recording page.
-
Access History (Optional): Click the History button to resume editing a previous recording.
-
Browser Permission:
- Click the Select Screen First button, a browser dialog will appear asking what to share.
- Select "Entire Screen", "Window", or "Tab".
- Important: To record system sound, make sure to check the "Share audio" box in the dialog.

-
Setup:
- Camera: Toggle on your webcam if you want to include a face cam.
- Microphone: Toggle on your microphone if you want to include a microphone.

-
Start: Click the large Start Recording button.
-
Record: Perform your demo or tutorial. When finished, click "Stop Sharing" in the floating browser bar or the stop button in Screentell.
Edit Your Video
Once recording stops, you'll be taken to the Editor.
Trim the Fat
- Drag the yellow handles on the timeline ruler to set the Start and End points of your video.
- Use this to remove the awkward beginning setup or ending moments.

Add Focus & Motion (2D Zoom / 3D Transforms)
- Play your video or scrub to a moment you want to highlight.
- Click on the timeline Motion track where you want to add a focus motion, a pop-up menu will appear.

- Select a motion from the pop-up menu.
- The Focus & Motion Panel will open. Adjust the Zoom Level slider to get closer. If 3D motion is selected, you can also adjust the Rotation, Position, Scale of start and end keyframes to fine-tune the focus.
Add a Sticker
- Click on the timeline Sticker track to add a sticker, a pop-up menu will appear.
- Choose a sticker type (e.g., Text, Shape, Line or Image).
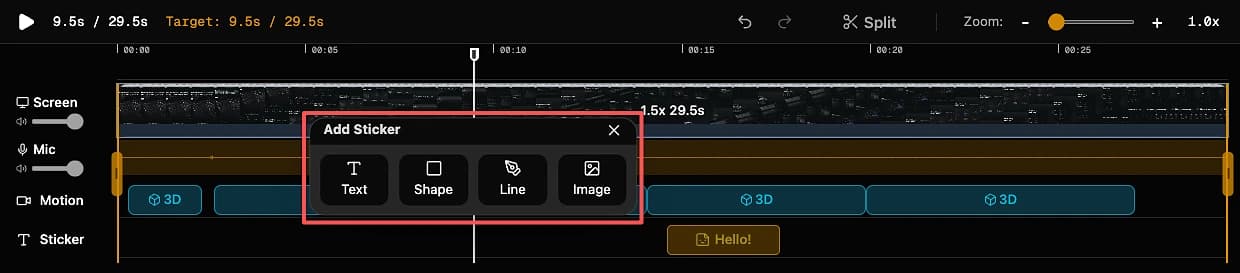
- Drag the sticker on the video to position it.
- Use the Edit Sticker Panel on the left to edit its content, color, border, rotation, etc.
Export
-
Click the Export button in the top right corner.
-
Choose your format:
- MP4: Best for compatibility and sharing (uses H.264 codec).
- WebM: Lightweight format, good for web use.
-
Wait for the rendering process to complete.
-
Your video will automatically download!
-
Click the Save button to save your Editing project to the browser's local storage. You can continue editing later.


Note: Your recording is automatically saved to your browser's local storage and can be accessed from the History panel for 30 days.
Introduction to Screentell
Screentell is a professional, web-based screen recording and editing studio designed to help you create stunning video content directly from your browser. Whether you're creating product demos, tutorials, or social media content, Screentell gives you the tools to tell your story effectively.
Focus & Motion (2D / 3D)
Screentell's "secret sauce" is its ability to create smooth, professional camera movements that guide your viewer's eye.